
Table of Contents
To install WordPress on Kinsta, you add a new site in MyKinsta in a few clicks, and Kinsta provisions a fresh, optimised WordPress install on Google Cloud with caching and SSL ready. No manual server setup or downloads are needed. This guide shows how to install WordPress on Kinsta step by step, choose settings, connect a domain, and get the new site online fast.
Last updated: August 2026. The install process and Kinsta details were read from kinsta.com. This page carries affiliate links to Kinsta, and it is precise that installation is free while a domain and email are separate costs.
Can You Install WordPress on Kinsta Easily?
Yes, you can install WordPress on Kinsta in a few clicks through MyKinsta, which provisions a fresh site on Google Cloud with caching, SSL and optimisation already applied. No manual server setup is needed, so even beginners get a ready-to-use WordPress site in minutes.
Verdict: Installing WordPress on Kinsta is a one-click job in MyKinsta that provisions a fresh site on Google Cloud with caching and free SSL, so no command line or database setup is needed. Two honest points: installation is free but a Kinsta plan from 35 dollars a month is required, and Kinsta does not host email, so mailboxes come from a separate provider.
The clearest path is to prepare a couple of things, run the one-click install, then connect a domain and SSL, which the sections below set out step by step.
“WordPress is a web content management system.”
— Wikipedia, WordPress
Kinsta installs that content management system for you, so the technical setup that once required a server and a database is handled automatically from the dashboard.
What Do You Need Before Installing?
Before installing WordPress on Kinsta you need a Kinsta account and plan, a chosen data center region near your audience, and optionally your domain details. You do not need to download WordPress or configure a server, since Kinsta handles the installation.
- A Kinsta plan: A plan sized to the site’s expected visits is the account the new install lives on.
- A data center region: Choosing a Google Cloud region near the main audience lowers latency from the start.
- Admin credentials: A strong admin username and password set during the install secure the new site.
- Domain details: The domain and registrar access are needed to point the site to Kinsta, though a temporary URL works while building.
- An email plan: A separate email provider is worth lining up, since Kinsta hosts websites and not mailboxes.
The honest note is that none of this requires technical setup, so having the plan, region and domain ready is all it takes to install in one sitting.
How to Install WordPress on Kinsta Step by Step
To install WordPress on Kinsta, log in to MyKinsta, add a new WordPress site, choose to install a new site, pick a data center and site name, set the admin login, and confirm. Kinsta provisions the site in minutes with caching and SSL, and you log in to start building.
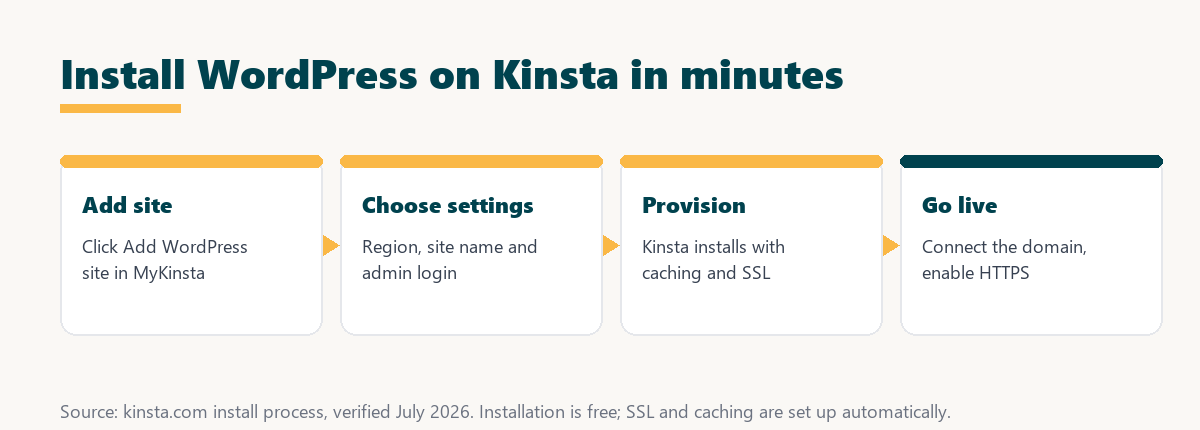
- Log in to MyKinsta: Open the dashboard and go to the sites area to add a new site.
- Add a new WordPress site: Choose to install a new WordPress site rather than migrating an existing one.
- Pick a region and name: Select a Google Cloud data center near the audience and name the site.
- Set the admin login: Choose a strong admin username and password for the new WordPress install.
- Confirm and wait: Kinsta provisions the site in minutes with caching and SSL, ready to log in and build.
The honest summary is that the whole install is a short form and a few minutes of provisioning, after which the WordPress admin is ready.
How to Choose Your Site Settings
When installing, choose a data center region close to the main audience for lower latency, set a strong admin username and password, and optionally select a starter setup. These choices affect performance and security, so the region and credentials are worth picking thoughtfully.
The practical guidance is to match the region to where most visitors are, since that single choice shapes the origin response time, and to avoid weak or default admin credentials that make a new site an easy target.
How to Connect Your Domain
After installing, connect the domain by adding it in MyKinsta and updating the registrar’s DNS to point at Kinsta, or use Kinsta’s temporary URL while building. Kinsta guides the DNS records, and once they propagate the site is live on its own domain with SSL.
The honest note is that DNS can take up to a day to propagate, so building on the temporary URL first means the site is ready the moment the domain resolves.
WordPress Install Steps on Kinsta
The install breaks into a handful of short steps, most handled by Kinsta. The table shows each step, the action, and roughly how long it takes.
Source: kinsta.com install process, verified August 2026. The install and SSL are quick; DNS propagation is the only step that can take up to a day.
In plain terms, you click to add a site, choose a few settings, and Kinsta provisions an optimised WordPress install, after which you connect the domain and SSL.
How to Add SSL and Force HTTPS
Kinsta provides free SSL, so after connecting the domain you generate the certificate in MyKinsta and enable force HTTPS to serve every page securely. This protects visitor data, is expected by browsers and search engines, and Kinsta makes it a one-click step.
The practical point is that HTTPS is not optional for a modern site, and because the certificate and the redirect are both one-click on Kinsta, there is no reason to launch without them.
How to Verify Your Install Worked
Verify the install by visiting the site and admin login, confirming pages load, SSL is active and caching is on in MyKinsta. A quick speed test confirms the premium performance, after which the theme, plugins and content can be added.
- Load the site: Open the homepage on the temporary URL or domain to confirm the fresh install renders.
- Log in to WordPress: Sign in at the admin URL with the credentials set during the install.
- Check SSL: Confirm the certificate is active and HTTPS is enforced so the site serves securely.
- Confirm caching: Verify caching is on in MyKinsta so the site benefits from the platform’s speed.
- Run a speed test: Measure load time to confirm the premium performance before building further.
“The first five seconds of page-load time have the highest impact on conversion rates.”
— HubSpot, page load time and conversion rates
Because those first seconds shape conversions, verifying speed and SSL on the fresh install means the site starts fast, which is easier than fixing performance after launch.
A fast, optimised WordPress install in minutes
See Kinsta Plans →One-click install with caching and free SSL, and a 30-day money-back guarantee.
How Much Does Hosting a New WordPress Site Cost?
Hosting a new WordPress site on Kinsta starts at 35 dollars a month for the entry single-site plan, which covers one site and 35,000 monthly visits. Installation is free and included, so the only cost is the plan, with annual billing giving two months free.
Source: kinsta.com pricing and kinsta.com/plans, verified August 2026. The entry plan covers 35,000 monthly visits; installation and SSL are free, and email is separate.
Put simply, installing is free and the only real cost is the plan and a domain, with SSL included and email handled by a separate provider.
Free install, from 35 dollars a month
View Kinsta Pricing →Installation and SSL included; the entry plan covers 35,000 monthly visits.
What to Do After Installing WordPress
After installing, set the permalinks, install a theme and essential plugins, enable caching and configure SSL, then create the key pages and content. Kinsta’s defaults already optimise performance, so the focus is on building rather than server configuration.
- Set permalinks: Choose a clean permalink structure early, since changing it later can affect existing URLs.
- Install a theme: Add and configure a theme that fits the site’s purpose and stays light for speed.
- Add essential plugins: Install only the plugins the site needs, keeping the list short to protect performance.
- Confirm caching and SSL: Verify caching is on and HTTPS is enforced so the site is fast and secure from launch.
- Create key pages: Build the homepage, about, contact and core content so the site is ready for visitors.
The honest takeaway is that Kinsta handles the infrastructure, so the after-install work is standard WordPress setup rather than server tuning.
Can You Install Multiple Sites or Multisite?
Yes, depending on a plan’s install allowance you can add several separate WordPress sites in MyKinsta, each in its own isolated environment. For a network from one installation, Kinsta supports WordPress Multisite on its 50 dollar tier and above, not on the entry 35 dollar plans.
The honest distinction is that separate installs suit unrelated sites, while Multisite suits a network of related sites, and the latter needs at least the 50 dollar tier, so the plan choice depends on which structure a project needs.
Is Kinsta a Good Host for a New Site?
Kinsta is a good host for a new site you intend to grow or monetise, since starting on premium infrastructure avoids a painful migration later. For a tiny throwaway project a cheaper host may suffice, but a serious new site benefits from Kinsta from day one.
“A tool is only worth its premium when the hours or revenue it protects exceed the invoice.”
— Growth Hack Suite, on tool ROI
For a new site the premium is worth it when the plan protects the speed and reliability a growing project will need, saving a later migration. Teams weighing platform dependence can read our note on SaaS vendor lock-in before committing.
How Do You Get Started Installing on Kinsta?
To get started, sign up for a Kinsta plan, open MyKinsta, and add a new WordPress site in a few clicks. Use free migration instead if you have an existing site, and the 30-day guarantee lets you try the platform risk-free before committing.
The honest summary is that the install is a minutes-long, no-code task, so most of the effort after signup goes into building the site rather than setting up the server.
Launch a new WordPress site risk-free
Try Kinsta Risk-Free →One-click install, free SSL and a 30-day money-back guarantee.
Install WordPress on Kinsta: Frequently Asked Questions
The 12 most-asked questions about installing WordPress on Kinsta.
How do I install WordPress on Kinsta?
In MyKinsta you click to add a site and Kinsta installs a fresh WordPress instance in minutes, so you skip manual downloads, database setup and configuration files.
Does Kinsta install WordPress automatically?
Yes, Kinsta provisions WordPress automatically when you create a site, setting up the database and files, so you get a ready-to-use install without touching the command line.
Can I choose settings during a Kinsta install?
Yes, when creating the site in MyKinsta you can set the site name, admin credentials, language and data center, and optionally install with common defaults.
How long does installing WordPress on Kinsta take?
A new WordPress install on Kinsta typically completes within a few minutes, after which you can log in to the WordPress admin and begin building the site.
Do I need technical skills to install WordPress on Kinsta?
No, Kinsta’s one-click WordPress installation removes the technical steps, so even non-developers can create a working site directly from the MyKinsta dashboard.
Can I install WordPress with a starter theme?
When creating a site you can start clean and then choose a theme in WordPress, giving full control over the design once the base install is ready.
How do I log in after installing?
After the install, MyKinsta provides the WordPress admin URL and credentials, so you open the login page, sign in and start configuring the new site.
Can I install multiple WordPress sites on Kinsta?
Yes, depending on the plan’s install allowance you can add several WordPress sites in MyKinsta, each in its own isolated environment on Google Cloud.
Does installing include a database?
Yes, Kinsta sets up the WordPress database as part of the automatic install, so you do not create or connect a database manually.
Can I install WordPress Multisite on Kinsta?
Kinsta supports WordPress Multisite on its 50 dollar tier and above, so you can run a network installation on a qualifying plan, but not on the entry 35 dollar plans.
What do I do after installing WordPress on Kinsta?
After installing, choose a theme, add essential plugins, configure caching-friendly settings and use staging to test changes, then point the domain’s DNS to Kinsta to go live.
Can I install WordPress locally before Kinsta?
Yes, you can build locally with the free DevKinsta tool, then push that WordPress site up to Kinsta staging and live rather than installing directly on the server first.
About this guide
Written by the Growth Hack Suite editorial team. The install process and Kinsta details were read from kinsta.com. This page carries affiliate links to Kinsta, so the honesty owed to a reader is stated plainly: installing WordPress on Kinsta is a one-click, minutes-long job in MyKinsta that sets up the database, caching and free SSL automatically. Installation is free, but a Kinsta plan from 35 dollars a month, covering one site and 35,000 monthly visits, is required, and a domain and email come separately. WordPress Multisite needs the 50 dollar tier and above, not the entry plan.


