Table of Contents
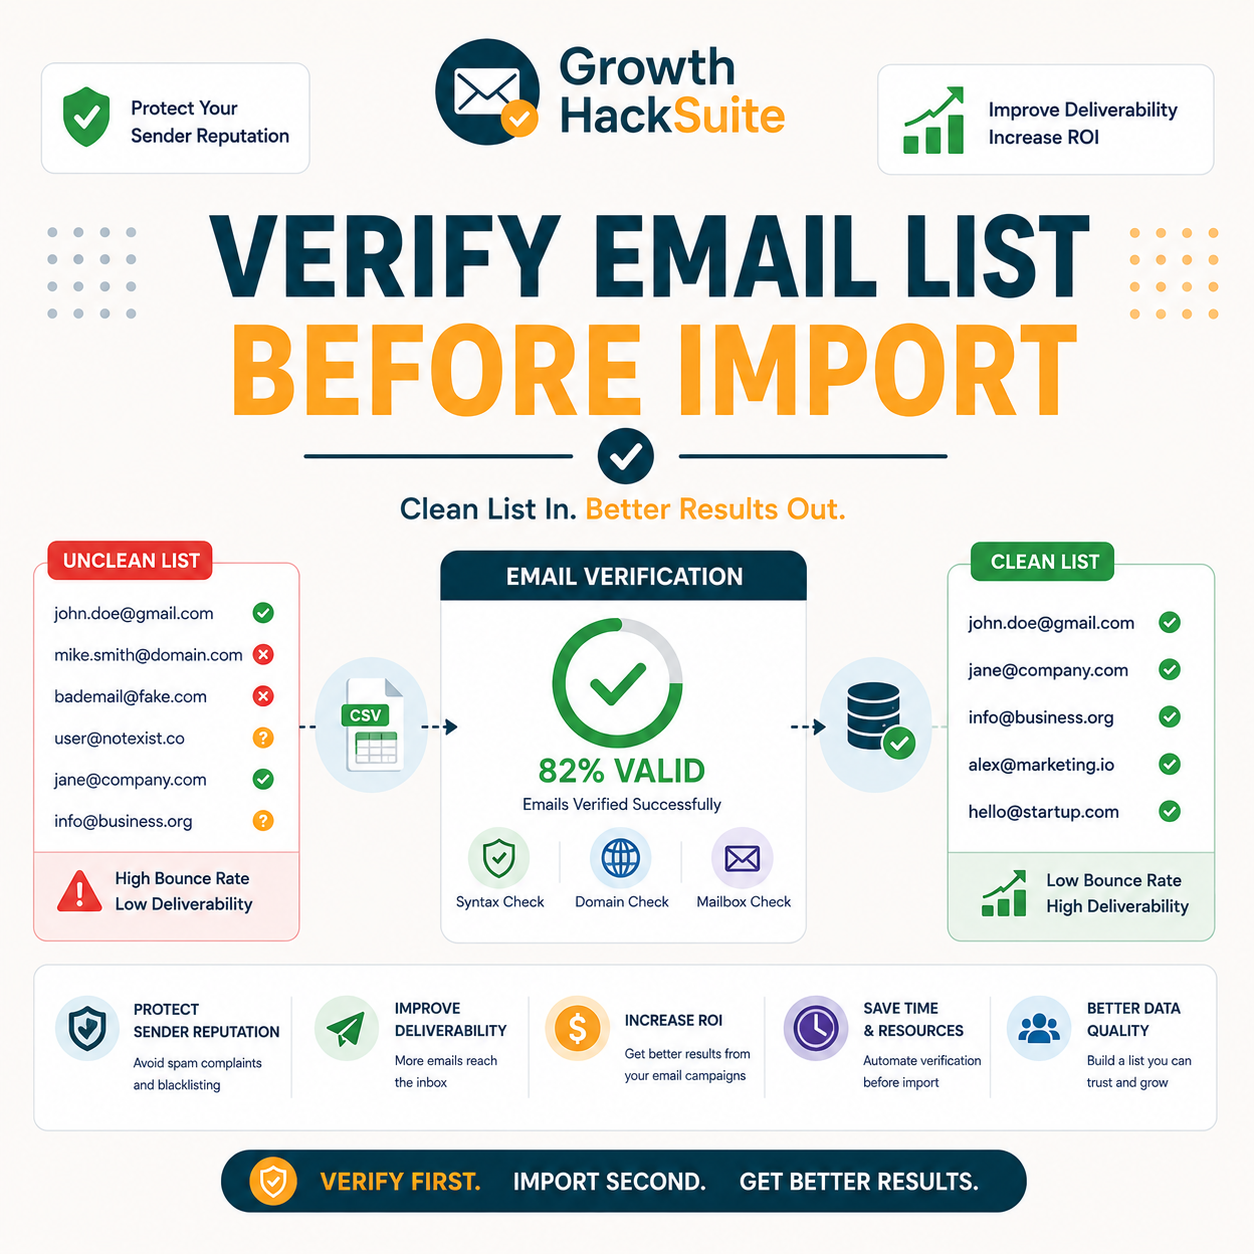
You should verify email list before import to any ESP or CRM, because importing invalids and traps damages the platform’s sending reputation from the first send. The workflow is simple: export the list to CSV, bulk-verify it, remove invalids, segment catch-alls, then import only deliverable contacts. This guide walks through each step, the cost of skipping it, and the tools that make a pre-import clean fast.
Verify your list free before you import it — protect your sending reputation from day one.
Verify Before Import Free →Free plan included · No credit card · Full status and scoring
Why Should You Verify an Email List Before Importing?
Importing an unverified list carries invalids and spam traps straight into an ESP, where the first send bounces and damages the platform’s shared sending reputation. Because that reputation is slow and hard to rebuild, a verify email list before import step is the safest way to protect deliverability from day one and keep future campaigns out of the spam folder.
- Protects ESP reputation: Removing invalids before import keeps the first send’s bounce rate low, which preserves the sending reputation that every later campaign depends on across the shared platform infrastructure.
- Avoids storing dead contacts: Verifying upfront stops dead and risky addresses from filling the ESP audience, where they inflate contact counts, raise the bill, and quietly drag down engagement metrics.
- Blocks spam traps early: Catching pristine and recycled traps before import prevents the blacklist hits that follow a single trap send, keeping the sending domain clear of damaging blocklist entries.
- Lowers the first-send risk: Cleaning the file outside the platform turns an unknown-quality list into a measured one, so the opening campaign behaves predictably instead of triggering a sudden bounce spike.
- Clean from day one: Starting with a verified, deliverable-only audience means the platform records strong engagement immediately, building reputation rather than spending months repairing it after a damaging first send.
Verifying before import keeps the ESP reputation clean, which is far easier than repairing it after a bad first send has already bounced.
How Do You Verify an Email List Before Import?
Run four steps before importing: export the list to CSV, bulk-verify it, remove invalids and segment catch-alls, then import only the deliverable addresses. Doing this outside the ESP keeps bad data from ever touching the platform’s reputation. The same pattern covers how to clean your email list before it reaches any marketing tool.
- Export to CSV: Pull the full list out of its current source as a CSV file with one email per row, creating the clean input every bulk verifier needs to process.
- Bulk verify: Upload that CSV to a verifier, which checks syntax, domain records and mailbox response, then returns a deliverability status for every address on the list.
- Remove and segment: Drop confirmed invalids, hold catch-alls for cautious sending, and keep valids, turning a mixed-quality file into a measured, deliverable audience.
- Re-test unknowns: Run any addresses returned as unknown through a second pass, since temporary server issues often resolve and recover otherwise-deliverable contacts that a single check would have discarded.
- Import clean: Load only the verified, deliverable addresses into the ESP or CRM, so the platform’s first send records low bounces instead of reputation damage.
Run the four-step clean free — verify your list before the import.
Verify Before Import Free →Free plan · No credit card · Export the clean file
Verify outside the ESP, then import clean, so bad data never touches the platform and the audience starts deliverable.
How Do You Export Your List for Verification?
Export the list from its current source as a CSV with one email per row. If it already lives in an ESP, export the audience or segment first. A clean CSV is the input every bulk verifier needs, so getting the export right avoids re-work and keeps the verify email list before import workflow moving quickly.
- Export as CSV: Save the list in plain CSV format from a spreadsheet, CRM or ESP export, since nearly every bulk verifier accepts CSV as its primary upload type for fast processing.
- One email per row: Structure the file so each address sits on its own row in a single column, which lets the verifier read, check and return a status for every contact cleanly.
- Note the source: Record where each batch came from, such as a form, event or purchase, because source quality predicts how many invalids the verification step will surface later.
A clean CSV export is the foundation of the process, so getting it right makes the rest of the workflow quick and predictable.
How Do You Verify and Segment Before Importing?
Upload the CSV to a verifier, then split the results: import valids, drop invalids, hold catch-alls for cautious sending, and re-test unknowns. Importing only deliverable addresses means the ESP starts with a clean audience and a protected reputation. Reading the verification statuses correctly is what makes segmentation reliable.
- Import valids: Confirmed deliverable addresses form the core import, since these mailboxes accept mail and produce the low bounce rate that protects the platform’s reputation on the first send.
- Drop invalids: Confirmed bad addresses get removed entirely before import, because each one bounces, signals poor list hygiene, and erodes the sending reputation other campaigns rely on.
- Hold catch-alls: Accept-all and risky addresses move into a separate segment for cautious, lower-volume sending, keeping uncertain results away from the clean core audience until engagement proves them safe.
- Flag disposables and roles: Throwaway domains and generic role inboxes get tagged for review, since both raise complaint and bounce risk and rarely belong in the high-value core audience.
- Queue unknowns: Addresses with an inconclusive status wait for a second verification pass rather than entering the import, preventing guesswork from contaminating the clean, deliverable core list.
Import only deliverables, because segmenting before upload keeps the ESP audience clean and reputation intact from the very start.
How Do You Import a Clean List Into Your ESP?
Import the verified, deliverable-only file into the ESP or CRM as normal, mapping fields and tagging the source. Because the list is already clean, the platform records low bounces from the first send, building rather than burning reputation. The same import flow applies whether the destination is Mailchimp, HubSpot or any other tool.
- Upload clean file: Load the verified, deliverable-only CSV into the platform’s import tool, so the audience begins with addresses that already passed validation and will not bounce on the first campaign.
- Map fields: Match each CSV column to the right ESP field during import, ensuring names, tags and custom data land correctly and downstream personalisation works without manual cleanup afterward.
- Tag the source: Label the import with its origin and verification date, which creates a clear audit trail and makes future hygiene checks and re-verification straightforward to schedule.
A clean import means the ESP’s first send builds reputation instead of bouncing, setting every later campaign up to land in the inbox.
What Does Importing Unverified Data Cost?
Importing unverified data triggers bounces on the first send, lowering the ESP’s sending reputation and pushing future mail to spam. Shared-IP ESPs can even restrict or suspend accounts with high bounce rates. The cost is degraded deliverability that is slow and difficult to reverse, far outweighing the few minutes verification takes.
Cleaning a list before sending protects deliverability and avoids the bounces that damage sender reputation.
— Hunter.io API documentation, email verification
Unverified imports can throttle an ESP account, so the reputation cost dwarfs the few minutes a pre-import verification actually takes.
Why Doesn’t ESP-Side Cleaning Replace Pre-Import Verification?
ESPs suppress bounces after they happen, but the damage to reputation is already done by then. Pre-import verification is proactive: it removes bad addresses before the first send, so the ESP never records the bounces that would lower its reputation. Suppression cleans up the symptom; verification prevents the cause.
Hunter’s own verifier review found accuracy holds strong on standard domains, with valid-status addresses bouncing under 2% across a 2,000-email benchmark, exactly the standard a list needs to meet before it ever reaches an ESP account.
ESP suppression is reactive, while pre-import verification is preventive, so only the latter avoids the reputation hit a bad first send causes.
How Bad Is a Typical List Before Import?
Lists awaiting import, especially purchased, event or aging ones, commonly show double-digit invalid and catch-all shares. Verifying before import surfaces this hidden risk, turning an unknown-quality file into a measured, clean audience. The table below shows typical pre-import findings by source from internal benchmark runs on sample lists.
Source: Internal benchmark — Hunter bulk verification of sample pre-import lists. Ranges are indicative of typical results by source, not third-party statistics; verify your own list to measure its real share.
Most pre-import lists hide a large risky share, so verification is what makes that risk visible before the ESP ever sees it.
How Do You Verify Before Importing to a Specific ESP?
The workflow is the same for any platform: export, verify externally, then import the clean file. Whether the destination is Mailchimp, HubSpot, Klaviyo or a CRM, verifying outside the tool first keeps each platform clean. Some offer add-on verification, but a pre-import clean is more reliable and protects reputation before the first send.
- Any ESP or CRM: The export, verify and import pattern applies identically across every destination, so one repeatable workflow covers Mailchimp, HubSpot, Klaviyo, a CRM, or any other marketing platform.
- Export-verify-import: Cleaning the file outside the platform means bad addresses never enter the audience, keeping the destination’s reputation untouched regardless of which tool ultimately receives the import.
- Add-ons versus pre-import: Built-in verification add-ons run after data lands, while a pre-import clean removes invalids first, making the external step the more reliable safeguard for sender reputation.
- Field mapping stays simple: Importing a clean, single-column-checked file keeps column mapping straightforward, since the verifier handles deliverability while the destination platform focuses only on storing and tagging the contacts.
- Repeatable across platforms: Documenting the export and verify steps once lets the same clean file feed several destinations, so a team importing to multiple tools avoids re-verifying the identical data each time.
The export-verify-import pattern works for every platform, so a pre-import clean beats relying on any built-in add-on for reputation safety.
What Tools Verify a List Before Import?
Any bulk verifier with CSV export works: upload, verify, export the clean file, then import. Hunter offers this with a recurring free tier; pure-play verifiers compete mainly on bulk price per 1,000. The table below compares tools on the features that matter most for a fast, reliable pre-import clean.
Source: Vendor pricing pages, verified June 2026. Feature availability changes; confirm current free tiers and export options on each provider’s site before buying.
Any bulk verifier with export works for the job, and Hunter’s recurring free tier makes the pre-import clean cost nothing to start.
When Can You Skip Pre-Import Verification?
Skipping is safe only when importing a small, recently verified, fully opt-in list from a trusted source. For anything purchased, aging, event-sourced or unverified, pre-import verification is essential. When in doubt, verify, because the cost is minutes while the risk is the ESP reputation that every future campaign depends on.
- Can skip if: The list is small, gathered through a confirmed opt-in within the last few weeks, and already verified at capture, meaning the addresses are fresh, permissioned and unlikely to have decayed before this import.
- Must verify if: The list was purchased, scraped, sourced at an event, aging beyond a few months, or carries any unknown-quality batch, since each of these conditions hides invalids and traps that will bounce on the first send.
Skip only for a small, fresh, opt-in import, and for everything else verify first to keep the ESP reputation safe.
Verdict: Always Verify a List Before You Import It
Verifying a list before import protects the sending reputation that cannot easily be rebuilt. Export, verify, remove invalids, segment catch-alls, and import only deliverables. For any list that is purchased, aging or unverified, this five-minute step is the difference between a clean ESP audience and a throttled, spam-foldered one.
Verdict: Pre-import lists commonly hide 10–40% invalid or risky addresses depending on source. The fix is four steps: export, verify, remove and segment, import clean. Skip verification only for a small, fresh, fully opt-in list. For everything else, five minutes of verifying protects an ESP reputation that takes months to rebuild.
Maintaining a clean list keeps deliverability high and protects the sender’s reputation over time.
— Wikipedia, Email marketing
Verify your list free before you import — start the clean now.
Verify Before Import Free →Free plan · No credit card · Clean before you import
Verify Before Import: Four Steps
Related Tools in the Hunter Stack
Verifying before import pairs with ongoing list hygiene and the broader Hunter toolset. The Hunter Email Verifier review covers validation depth, and the finder review covers building the prospect lists worth cleaning in the same connected stack.
- Hunter Email Verifier: The validation layer that powers the pre-import clean, including how it works and what it flags — start with what the Hunter Email Verifier is.
- Hunter Email Finder: The list-building half of the bundle on the same credit pool — read the Hunter.io email finder review for sourcing costs.
- Verification basics: The underlying check every import relies on — see how email verification works before cleaning a list.
Verify Email List Before Import: Frequently Asked Questions
The 12 most-asked questions about verifying a list before import.
Why verify an email list before importing?
Verifying before import removes invalids and spam traps so the first send bounces little and the ESP records strong deliverability. Because sending reputation is slow to rebuild once damaged, cleaning the list outside the platform first is the safest way to protect every campaign that follows.
How do I verify a list before import?
Run four steps: export the list to CSV, bulk-verify it in a verifier, remove invalids and segment catch-alls, then import only the deliverable addresses. Doing this outside the ESP means bad data never touches the platform, so the first campaign sends to a clean, deliverable audience.
How do I export my list for verification?
Export the list as a CSV with one email per row from a spreadsheet, CRM or existing ESP audience. A clean, single-column file is the input nearly every bulk verifier expects, so a correct export avoids re-work and keeps the rest of the workflow fast.
How do I import a clean list into my ESP?
Load the verified, deliverable-only file into the platform’s import tool, map each CSV column to the right field, and tag the import with its source and verification date. Because the list already passed validation, the first send records low bounces and starts building reputation rather than burning it.
What does importing unverified data cost?
Unverified imports bounce on the first send, lowering the ESP’s sending reputation and pushing later mail toward spam. Shared-IP platforms can throttle or suspend accounts with high bounce rates, so the real cost is degraded deliverability that takes far longer to fix than the minutes verification needs.
Does ESP-side cleaning replace pre-import verification?
No. ESP suppression removes bad addresses only after they bounce, by which point the reputation damage is already recorded. Pre-import verification is proactive, stripping invalids before the first send so the platform never logs the bounces that would lower its standing in the first place.
How bad is a typical list before import?
Pre-import lists commonly hide double-digit invalid and catch-all shares, with purchased lists often the worst and aging opt-in lists decaying naturally over time. The only reliable way to know a given list’s real quality is to verify it, which turns an unknown file into a measured audience.
How do I verify before importing to Mailchimp or HubSpot?
The process is identical for any platform: export the list to CSV, verify it in an external verifier, remove invalids and segment catch-alls, then import only the deliverable addresses. Verifying outside Mailchimp, HubSpot or any tool keeps the destination clean and its reputation protected.
What tools verify a list before import?
Any bulk verifier with CSV upload and export works, including Hunter, NeverBounce, ZeroBounce and Bouncer. Hunter stands out with a recurring free tier plus status and confidence scoring, while pure-play verifiers compete mainly on bulk price per 1,000 verified addresses.
When can I skip pre-import verification?
Skipping is safe only for a small, recently verified, fully opt-in list from a trusted source. For anything purchased, scraped, event-sourced, aging or of unknown quality, verification is essential, because those lists hide invalids and traps that bounce on the first send and damage reputation.
Will a bad import throttle my ESP account?
It can. Shared-IP ESPs monitor bounce rates closely, and a high-bounce first send from an unverified import can trigger warnings, sending limits or account suspension. Verifying before import keeps the bounce rate low, which is the simplest way to avoid these platform restrictions entirely.
Should I always verify before importing?
For almost every list, yes. The only safe exception is a small, fresh, fully opt-in list verified at capture. Given that verification takes minutes and a damaged reputation takes months to rebuild, defaulting to verify before any import is the low-risk, high-return choice.